There's this *thing* that has happened to me for most of my life. I always figured it would stop eventually, but apparently, I was wrong.
Frequently, when I am introduced to someone, the person making the introduction says something along these lines,
"This is my Daughter/Friend/Sister/Wife/whatever, Kathi, she's an Artist."
(I'm not sure why that needed to be included)
Then the person being introduced does some sort of variation on,
"
Ohhhhh, how *interesting.*"
(I think they might have actually rolled their eyes)
At which point, for some completely unknown reason, the person introducing me feels the need to add. . .
"She's VERY creative/talented/artistic/insert some other awkward adjective.
THIS is when the *thing* happens. The other person says something like,
"I can tell!"
(cringe)
O.K., when I was a kid, this wasn't so weird. I usually was sitting nearby actually drawing something. You know, it's cute, a little girl drawing
horsies in a notebook. I get that.
Even later, when I was a teenager, trying desperately to "express myself." When they said "I can tell!" It might have had something to do with my
unusual fashion sense or possibly the fact that I frequently had spiderwebs or hearts drawn on select areas of my face in black liquid eyeliner. I get that. It makes sense.
But this happened to me AGAIN 2 weeks ago.
"This is Jim's wife, Kathi."
Oh please, don't say it. "She's an Artist."
Doh!"Oh
reeeeally?"
Ugh, let's leave it at that, O.K.?"She's VERY talented."
Seriously, we're gonna do this?"I can see that!"
Aaaaaand , there it is.It was all I could do to keep myself from grabbing this woman and asking her what in the world THAT was supposed to mean!! I looked like any other slightly plump, middle aged, woman, in Shape-ups, blue jeans, and a standard issue Wisconsin winter coat! What does that mean? It still makes me feel creepy, just writing about it. Granted, that whole brief exchange is weird, so it isn't surprising that it ends on such an awkward note.
It shouldn't bother me. I know that people are proud of me and they want other people to know what I do. I think the heart of the matter stems from the fact that when someone says they're an artist, it evokes a lot of different images. For all they know I could be sitting in the corner of my basement, gluing silk flowers on the cat. Maybe they think I'm one of those "artists" that gets a government grant to spend my days in coffee houses acting moody and my nights rolling around naked on canvasses covered in chocolate pudding. Everyone has a different idea of what an artist is, so I guess I can't blame them for sounding patronizing.
Maybe it's time I got the tattoo I've been wanting for so long. I had originally wanted a nice, discreet, little octopus in an easily covered location, but I could always make the facial cobwebs permanent instead. Then I wouldn't have to wonder any longer what people mean when they say "I can tell." heh!


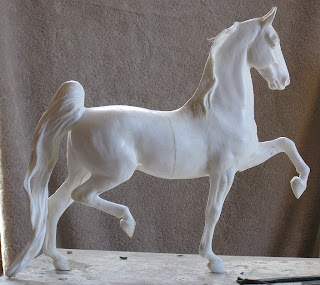 I know it shouldn't have been such a concern. Three points touching isn't a new concept in model horsedom. It's a totally new thing in Kathi Boguckidom though. I've only done two sculptures that didn't have bases (well, four if you want to count the two that are laying down) and both of those had all four on the floor. So, I still had my concerns that it would balance correctly and not go crashing over sideways. . .or worse *forwards!* Anyhow, this one is off to the prepper for that smooth finishing touch. In the mean time, I'm casting one more to become this one's brother from another mother. . .mold. Har har! Sorry about that. . . I'm feeling a wee bit punchy tonight. :^o
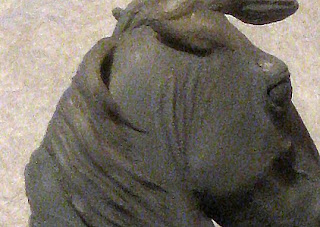
 This is the clay sculpture covered with the flexible silicone mold. The layers are carefully applied one at a time, allowing them to cure between coatings. We alternate colors to ensure an even coat and usually do 6 layers or more.
 Yes, those are the magic artist hands up there in that pic. That block o' stuff on the horse there is the plaster mother mold. It gives a rigid backing to the flexible inner mold so that anything cast in it comes out shaped like it's supposed to and not like some sort of funhouse mirror version of the sculpture. The plaster is put on in four main sections using clay walls to contain each part until the plaster dries. (I am *really* sorry I don't have pics of that, it'll have to remain a mystery until another occasion arises to make a mold) Needless to say, it's an incredibly messy process that ends with everything and everyone covered in plaster and pottery clay.
 Front half of the mold successfully removed. *whew* There is potential at this stage for the mold to lock up and refuse to come off smoothly so it's always a welcome sight to see things coming apart relatively easily!
 No, your moniter doesn't need adjusting, it really is pink. We brush the whole piece down with a parting agent to help the mold come away from the silicone and keep the plaster sections from sticking to each other. Because we end up with what is essentially a big lump of plaster when the mother mold is complete, the color is added to make it easier to find the partings between the sections when we first remove them like we are doing in these photos. Scrape, scrape, scrape. . . look for the hairline of pink color. . .insert knife edge. . .tap tap. . .pry *gently* apart.
 This is good. . .everything came off o.k. with only a tiny bit of cracking in an inconsequential spot.
 THIS is why I am an anxious mess while the mold is in process. When you use a soft oil base clay, your original is destroyed. If something terrible goes wrong with the mold (and it hasn't yet
 Yeah, remember in the beginning when I said this was just how we do it? Yup, if it ain't broke, don't fix it. ;^P It turns out that we can pour casting resin into these molds too.
  So, even though this horse isn't destined to be done in bronze, the mold will still do the job.
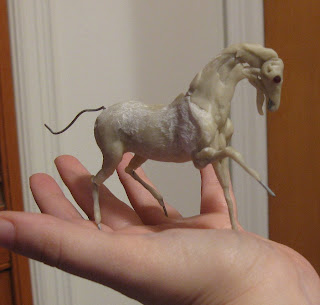
 Right here. . . the moment I can breathe easy. One hard copy, in hand, a good casting. I'm finally relaxed for the first time in more than a week. Look at the mess he's laying in though! It was a rough time bringing him back into the world in this new form!


